Pages

Saturday, December 10, 2011

The Best Pizza You (even you in central Missouri) Have Never Heard Of


   Ellis Bakery.  Much like our small town itself, if you blink, you might miss it.  Located on a side street, inside a steel building that looks more likely to house, well...anything other than a bakery, is one of mid-Missouri's best-kept secrets.  In addition to making small quantities of breads and sweet baked goods (cinnamon rolls on the weekends, for example) for local grocery stores, Randy also cooks up great, simple, classic American pizza.  If you think 'pizza' in mid-Missouri, you generally think Shakespeare's and, let's be honest, they make an amazing pie as well.  Shakes is different, though, with a fairly thick, rich crust (and an amazing wheat crust, but that's another post) and mountains of toppings, some of a somewhat exotic nature.  Shakes pizza is awesome, but it's fairly pricey and can be pretty greasy as well, depending on the toppings you get. 
   Ellis Bakery's pizzas, as cooked up by Randy, however, are fairly minimalist in comparison.  Simple ingredients, classic 'hand-tossed' original crust, and a simple, slightly sweet, lightly savory sauce.  Oh, and the price? A large (the only size they offer) cheese starts at $9.00, with each additional topping only a dollar extra.  We've tried to pin down exactly what it is that makes this pizza so great on several occasions, but it's really pretty difficult.  The crust is awesome, with just a hint of sweetness and some similarities to a nice Italian loaf (I think Randy said the pizza dough recipe is fairly similar to his Italian bread recipe), the sauce is simple, and the ingredients are fresh.  In the end, I think, it's a good example of how restraint and simplicity can produce something that's far more than the sum of its parts. 

Healthy 'Biscuits' and Gravy


Over the last several months, my wife and I have been trying to eat a bit healthier and start a more intense workout regimen.  This is, in itself, fairly difficult (especially if you love food like we do!) but the situation is complicated further by the fact that we're both in graduate school, Jess works two jobs, and we have a 45 minute commute every day.  Convincing yourself to eat healthier is, in those circumstances, not so easy at times.  This week, though, we came up with a recipe that both tastes far worse for you than it is, and is easily made up in bulk ahead of time, so that you can just heat it up in the morning and go.

Both of us love biscuits and gravy but, let's face it, it's probably one of the most unhealthy breakfasts you can have.  With a few small tweaks, though, you can get most of the taste of this classic breakfast, with a lot fewer calories and fat.

      Healthy 'Biscuits' and Gravy                 (9 half-cup servings)

             -1 lb Honeysuckle White Original Breakfast Sausage
             -1.5 cups Uncle Buck's Cream Gravy Mix (available at Bass Pro Shops)
             -4 cups water
             -Healthy English Muffins (we like Thomas' Light Multi-Grain English Muffins)

This one's super simple.  Cook the sausage according to the directions on the packaging and set aside.  We didn't find the need for any oil or even cooking spray to get this one to fry up nicely.  After that, mix the Cream Gravy mix with the water and cook until thickened, following the directions on the package.  When thick, add the crumbled turkey sausage and continue to cook for a few more minutes, making sure that the gravy doesn't burn on.  You can add red pepper flakes if you want a bit more kick to the gravy, though we typically add them later, when we're ready to serve.

This recipe makes nine half-cup servings.  One half-cup of gravy plus one English muffin comes out to a total of 260 calories and 9 grams of fat.  Not bad for a breakfast that tastes like it should be significantly worse for you! 
            

Friday, November 4, 2011

Friday Night Cocktail {2}


"Friday Night Cocktail" is a blog feature that we have here once a week to highlight a new cocktail! Each week we'll share a new cocktail recipe and some of our brief thoughts about it!

In honor of November and the fall season, this week's Friday Night Cocktail is...


Pumpkin Martini
(from the recipe found HERE)

3 oz Snow Queen vodka
1.5 oz Hiram Walker Pumpkin Spice Schnapps
Splash of simple syrup (using our easy method!)
Black sugar for the glass rim


  1. (Optional) Use colored sugar on the rim of your martini glass.
  2. Simple! Shake and serve!
Some thoughts on this recipe...
  • The original recipe actually called for a 3-to-1 ratio, but we upped the pumpkin to 1.5 oz.  This was still a VERY boozy cocktail. A different recipe (on the bottle) called for a 1-to-1 ratio.  I would probably recommend at least a 2-to-1 ratio instead of the original.
  • I, personally, like the sugar rim as it helped with the "booziness" of the drink.  We also added a cinnamon stick which added a little spice to the drink--DEFINITELY recommended. :-)

Be sure to check back next week! We'll be making a S'mores martini or another pumpkin drink...

Friday, October 28, 2011

Friday Night Cocktail {1}


"Friday Night Cocktail" is a new blog feature that we're going to be starting where once a week we highlight a new cocktail! Each week we'll share a new cocktail recipe and some of our brief thoughts about it!

In honor of Halloween, this week's Friday Night Cocktail is...


BLOODY RUM PUNCH
(from the recipe found HERE)

1/2 bottle Castillo white rum
1/4 bottle 337 Cabernet Sauvignon
2 oz. lime juice
3 oz. Hiram Walker triple sec
3 oz. simple syrup


  1. We started by making the simple syrup--but with a SHORTCUT!  To make a quick and easy simple syrup, you use a 1-to-1 sugar-to-water ratio.  Shake or stir the mixture until the sugar is thoroughly dissolved.  (The difference is mostly in the consistency as this quick mix is slightly thinner than the more labor-intensive cooked simple syrup.)
  2. Next, you simply mix all of the ingredients together and let sit in the refrigerator for awhile! The website suggests about 2 hours and I would probably agree.
  3. Serve! :-)
Some thoughts on this recipe...
  • Definitely don't skip the chilling!  This drink is best served COLD.  I recommend serving this over ice.
  • It's a bit "bitey" (boozy) at first sip. You definitely taste all that booze it has!  This is why I think it's best served really cold, otherwise the booziness is a bit overwhelming.
  • Go cheap! We used less expensive rum and it would totally work with an inexpensive red (such as the $3 Merlot from HyVee) or whatever you have on hand that you're willing/ready to part with.  This isn't a drink that relies on top-shelf products to make it delicious. 

Be sure to check back next week! We'll be making a S'mores martini...

Sunday, August 21, 2011

Tequila Lime Chicken


I have no idea where this summer went, but alas, it's back to the grind come tomorrow morning.  We decided we wanted to cook something really delicious tonight but something that wouldn't undo in advance the workout schedules we've set up for the following weeks.  We decided upon Tequila-Lime Chicken, a recipe which my family began cooking maybe 7-8 years ago.  And it's fantastic, if I do say so myself.


However many years ago it was, I wasn't really into cooking in any real way.  This was one of the first things that wasn't out of a box that I can remember cooking.  I found a recipe for a 'copycat' of Applebee's (yeah, I liked Applebees back then...) Tequila-Lime Chicken on the internet and figured I'd give it a go.  I spent a long time scouring websites for this recipe today, but with no luck.  There are several 'copycat' recipes out there for Applebees' Tequila-Lime and Fiesta Lime (I think the name just changed) Chicken, but they're all somewhat different.  Although I've tinkered with one or two ingredients, I cannot take any credit for this recipe, though unfortunately I'm not sure who ought to receive said credit.  Anyway, onto the recipe!

Tequila-Lime Marinade (for 2-3 medium-large to large chicken breasts):

  • 1/2 c. water
  • 1 c. teriyaki sauce (the really thin stuff, not a thick brush-on marinade)
  • 1.5 oz lime juice (fresh or the stuff from the squeezable plastic lime)
  • 1 oz tequila 
  • 1 TBSP minced garlic 
  • 1/2 TBSP liquid smoke
  • 3/4 tsp salt ]
  • Scant 1/2 tsp ground ginger
Mix all ingredients together, shake well to combine, and pour into shallow glass baking dish.  Marinade the chicken breasts in this mixture, turning occasionally.  We marinaded them overnight, although some people argue that in this amount of time the acidic lime juice can toughen the meat.  We shall see.

When the chicken breasts have thoroughly marinaded, all you do is throw them on a hot grill and grill 'em up.  We're only halfway there though.  There's a really delicious (and spicy) Mexi-ranch sauce that goes great with this, and it should be made up a day or two ahead, so that the flavors can blend.  The following recipe will make more than you'll need for 2-3 breasts, but it keeps well, and goes great on turkey sandwiches and a variety of other things!

Mexi-ranch dip:

  • 3/4 c. low-fat sour cream
  • 3/4 c. light mayo
  • 1 TBSP white vinegar
  • 1 TBSP dried onion flakes 
  • 1 TBSP dried parsley flakes
  • 1 tsp cayenne (this gives it a decent kick, back off to 1/2 or 1/4 tsp if you don't like heat)
  • 1/2 tsp salt
  • 1/2 tsp dried dill weed
  • 1/2 tsp paprika 
  • 1/2 tsp cumin powder
  • 1/2 tsp chili powder
  • 1/2 tsp garlic powder
  • 1/8 tsp black pepper 


Top each chicken breast with a bit of sauce, and sprinkle some shredded Colby-Jack or Mexican-style cheese over the top.  A few pieces of diced tomato or cilantro are nice garnishes as well.  For a bit of extra texture, serve this over crunchy tortilla strips, like the multi-colored ones you can buy at the store.  We opted to go for some HyVee baked all-grain crisps with sea-salt because they're what we had.  Once everything is on the plate (including the side-dish, below) throw this under the broiler for a minute or two, just until the cheese melts.


This chicken has so much flavor that you don't want to serve it with anything really crazy.  Keep it simple, and go with something like classic Spanish rice.  The recipe we used is adapted from here.

Spanish Rice (two servings):

  • 1 TBSP olive oil
  • 1/2 red or white onion, finely chopped
  • 1/2 tsp crushed garlic
  • 1 c. medium-grain white rice
  • 1.5 c. chicken stock
  • 1 small tomato, finely chopped
  • 1/2 tsp. dried oregano
  • 1 tsp chili powder
  • 1/2 tsp salt
Lightly brown the rice in the oil in a small skillet.  When rice is beginning to brown, add onions and garlic and sauté until fairly soft.  Meanwhile, add other ingredients to a medium saucepan and bring to a simmer.  Add the rice, stir well, cover, and set the heat to low.  Cook 20-25 minutes.


The Verdict: Except for being slightly overcooked from uneven heating on the grill (I'm still getting the hang of charcoal grilling) this was really tasty! Everything was pretty much as I remember it, which is a good thing.  And how to top off the meal?  A cold Negra Modelo with a lime wedge (which I'd normally consider sacriledge) like they serve at La Fiesta back in Morton, IL!


Wednesday, August 17, 2011

Some Really Old (and Really Delicious) Ice Cream

Funny thing about freezers (especialy chest freezers) is that things can get buried deep down in the bottom, never to be seen again.  Well, almost never again.  When we got a second freezer, we found out that we had one pint left of Haagen Dazs Sticky Toffee Pudding Ice Cream.  For a lot of you, this may sound like the weirdest ice cream flavor you've ever heard of, but for those of us who love the classic British dessert, it's perfectly logical to turn it into a frozen treat! 
This flavor was the winner of 'Scoop!', a Food Network special that ran back in 2006 (that's right, five years ago!).  The whole idea of the show was for a bunch of people to compete with weird and whacky flavors for new ice creams and the winning recipe would become a limited release flavor from Haagen Dazs.  Jess and I were both pulling for the sticky toffee pudding, and we couldn't believe it; it won!  When the ice cream finally came out (2006 or 2007, I can't remember) we bought a bunch and, apparently, we'd saved one for a lot longer than we'd thought.  Oh well, we popped it open tonight and it was delicious!  There was just a tiny change in the consistency from fresh, but for an ice cream that's 4-5 years old, it's quite remarkable. 

The ice cream, while listed as simply 'vanilla' tasted remarkably like fresh vanilla custard (often served alongside the original dessert in England).  The cake was rich and sugary, with really nice dark caramel and dark fruit (think dried raisins or figs) flavors.  This is quite sweet, and every bit as decadent as the original.  There's a reason we still had this in our freezer (other than our forgetfulness).  Both of us agreed that this was probably the single best ice cream flavor we'd ever had.  Hopefully, a homemade take on this is somewhere down the line...


Sunday, August 14, 2011

Traditional English Cream Tea...


...is what we decided we'd have for dinner tonight!  It's something we'd been wanting to try our hands at ever since we had it over in England at Betty's in York.  The traditional English Cream Tea consists of tea and scones, generally served with clotted cream and/or fruit preserves.  It sounds more like just a light snack, but with the dense buttery scones and the added richness of the clotted cream, it's typically plenty for a light afternoon meal.  We had to begin with tea, of course.   


This is my favorite bland, and is actually what convinced me (back in 2005 when I first went to England) that tea could actually be delicious.  At Betty's they serve it with cream (we used 2% milk) and both white sugar and lumps of delicious dark brown sugar (which sadly we didn't have). 

Having never made scones, I wanted a simple, straightforward recipe that was fairly foolproof, yet authentic.  I found the following recipe on the BBC website

  • 8 oz self-rising flour (we were out, so I had to substitute using this recipe).
  • pinch of salt
  • 2 oz. butter
  • 1 oz. sultanas (raisins)
  • 1 oz. caster (superfine) sugar (if you don't have it, just whir table sugar in coffee grinder for a few sec)
  • 5 fl. oz. 2% milk
First set your oven to 425 F.  Combine the flour, salt, and butter, rubbing together between your fingers until well blended.  Add the sultanas, sugar, and milk, and blend until you've formed a loose dough.  Turn this out onto a lightly floured board and knead lightly.  Roll to about 1/2 inch thick, and cut out rounds (if you don't have a round cookie cutter, you can do like we did and use a wine glass).  Reform the dough and continue to form scones until you've used the remaining dough.  Brush the tops of the scones with milk, and bake at 425 for 12-15 minutes or until the scones are lightly browned on top. 


After they've baked, arrange on a plate and serve with clotted cream and whatever jam or jelly you prefer.  We served the scones with a side of the sugared strawberries my mom cans every year from my dad's garden back in IL and they were delicious! 


While you can just use butter instead of clotted cream, it's not traditional and, stickler though I admittely am for these things, it really truly is worth the cost (one 6oz. jar ran something like $7-8 I believe) to track down authentic clotted cream if you can find it.  We found ours at one of the local HyVee stores: the only place that seems to sell it anywhere in the vacinity of Columbia.


In the end, everything turned out quite nicely.  The scones were lightly browned on the outside, with a wonderful toasted buttery crunch.  The texture was pretty spot on too, although not quite as poundcake-dense as the ones we had at Betty's were.  The clotted cream was remarkably (really surprisingly, actually) good, especially for being a bottled product and being shipped all the way over here.  The best way I can describe the taste is richer and slightly earthier than butter, almost halfway between butter and a really mild, fresh cheese.  The interior of the scones wasn't quite as rich as I would have liked; I'm toying with adding a touch more sugar or butter to the recipe next time we make it to see if this improves things at all.  But then again, maybe I shouldn't compare my cooking to Betty's, as they've gained the reputation they have for a very good reason.

Pizza-Style Stuffed Zucchini

I definitely adore zucchini.  I think I could seriously eat it every day when it's in season because there are just so many delicious things that you can do with it! I've made spicy zucchini quesadillas, Greek sytle zucchini pita pockets, open-faced zucchini sandwiches, zucchini bread,...the list goes on and on!  This week, however, I'm re-making a delicious recipe that I've tried once before: pizza-style stuffed zucchini. (And I made a double batch for my lunches this week)

Pizza-Style Stuffed Zucchini
(adapted from Green Lite Bites)

  • 1 medium-large zucchini
  • 4 TBSP tomato paste
  • 1/2 pkg. reduced fat feta
  • 1/2 tsp garlic powder
  • 1/2 tsp oregano
  • 1/2 tsp basil
  • 1/2 tsp Emeril's Essence
  • Penzy's Pizza Seasoning (topping--amount to your liking!)

Preheat the over to 425°F.

Hollow out your zucchini to make your "zucchini boats." I just use a regular spoon to do this, but you could also use a melon baller or something like that.

Chop the scooped out zucchini into small pieces and then combine with the feta, tomato paste, and spices.

Divide the mixture into your waiting zucchini boats and sprinkle with the pizza seasoning.

Cook the zucchini for 25 minutes or until they achieve your desired softness! Enjoy!

Saturday, August 13, 2011

Zesty Peach Barbecue Sauce

Yay for weekend cooking!  This was my weekend to choose something fun to make, and instead of opting for a more "traditional" meal or something of the sort (i.e. baking), I chose canning! :-)  I've been eyeing my Ball canning and preserving cookbook for awhile now and I wanted to make something fun.  So, I decided it was time to try making barbecue sauce! However, since "regular" barbecue sauce is something everyone pretty much already loves and mine would, of course, never live up, I decided to try something new and different: peach barbecue sauce!


Zesty Peach Barbecue Sauce
(from Ball Complete Book of Home Preserving)

  • 6 cups chopped peaches 
  • 1 cup finely chopped, seeded red bell pepper  
  • 1 cup finely chopped onion 
  •  1 1/4 cup honey 
  •  3/4 cup cider vinegar 
  •  1 TBSP Worchestershire sauce 
  •  3 TBSP finely chopped garlic 
  •  2 tsp ground mustard 
  •  2 tsp red pepper flakes 
  •  2 tsp salt


The recipe is pretty easy, seeing as you combine all the ingredients in a stainless steel saucepan and cook until it is the consistency of a thin commercial barbecue sauce.  Dan and I opted to puree all of the ingredients first in hopes of getting the best consistency possible. Here's what it looked like when we started cooking:

We let this cook for about 25 minutes, stirring frequently. Well, actually we let it cook for a bit longer than that because I totally forgot to start my water bath and it takes forever to start boiling. Anyway, it thickened up pretty well.  I think it's still a little bit runnier than most commercial barbecue sauces, but no real complaints about that.  We put it into 7-8 oz. jars and processed in a water bath for 35 minutes.  While cooling, they all sealed fairly quickly--quite the accomplishment for me since usually I have 1 or 2 that don't seal! 

We popped one jar open for dinner with grilled chicken, baked beans and fried zucchini so that we could taste it.  It was delicious! The peach flavor isn't really strong, but it does add a certain sweetness to the sauce.  The red pepper flakes definitely give it a spicy kick as well!  The thing that surprised us the most was that it has a distinct "barbecue flavor" despite being such a non-traditional barbecue sauce (i.e. no tomatoes, lol).  Three or four lucky people will probably get a jar of this for Christmas. ;-)


Monday, August 8, 2011

Hummus! (and some serving ideas)

At some point, turkey sandwiches (in all their various incarnations) become a bit dull for lunch.  We typically switch sandwiches out for Lean Cuisine meals every couple of weeks, but this gets expensive pretty quickly, and a lot of times you never really feel full after those pre-packaged diet meals.  With fresh veggies (peppers, onions, cucumbers, tomatoes, etc) in season, we thought we'd do veggie sandwiches for a week or so, but you can't have a proper veggie sandwich without a great hummus.  Below is our favorite (and now standard) recipe.  Thanks to Josh N. for the basic recipe; we've since tweaked it, made some additions and a few changes, and have decided that this recipe is just about perfect for us.  For four servings...

  • 1 (16oz) can chickpeas (garbanzo beans), rinsed and drained
  • 1 1/2 TBSP crushed garlic
  • 3 TBSP lemon juice (the stuff from the plastic lemons is just fine)
  • 1 tsp. extra-virgin olive oil
  • 1/2 tsp. dried oregano
  • 1 1/2 TBSP tahini
  • 1/2 tsp. za'atar spice mix (available at Middle Eastern/Mediterranean markets, or here)
  • 1/8-1/4 tsp. cayenne pepper (optional)
Blend all ingredients in a food processor to desired consistency.  We prefer it pureed, but even so, this recipe makes a somewhat 'drier' hummus than some prefer.  You can experiment to find the consistency you like best.  The flavors are good fresh, but after a day in the refrigerator, the flavors meld and gain a lot of depth.  Unfortunately, hummus is one of those things that just doesn't look anywhere nearly as good as it tastes. 


This is, for us, one of the quintessential comfort foods (and it's healthy!)  You can do a lot with it, but here are a few of our favorites. 

  • Slap it on some light wheat bread with a slice of pepper-jack cheese
  • Serve on a plate with warm pita bread for dipping (sliced baguette, brushed lightly with olive oil and lightly toasted is also excellent)
  • Or, serve it on light wheat bread as a sandwich with some (or all!) of the veggies below.

Impromptu Date Night (Apple Bourbon Pork Wellington)

Lately, my wife and I have been trying to take a little bit more time to enjoy the simple things in life in order to combat the high levels of stress that come with work, grad school, a faltering economy, etc.  For me, this has meant trying to get back into the kitchen a bit.  I'd really forgotten how much I love to cook and what a great stress reliever it is.  So last night I thought I'd make something special for Jess for when she got home from work.  On a whim, I decided to take my first stab at Wellington.  Not wanting to spend the money on a really pricey cut of beef, however, I decided to start with this.


Beef Wellington is typically made from a high-quality cut of beef, covered in pate (often foie gras) and duxelles (a mushroom, butter, and herb mixture), wrapped in puff pastry and baked.  Like I said, I didn't really want to spend a ton of money on a pricey cut of beef, especially since Jess doesn't have the same love for red meat as I do.  Furthermore, we don't eat foie gras for ethical reasons, and Jess hates mushrooms.  Ok, so we're going to have to get creative here.

The pork loin I bought last week was flavored with an 'apple bourbon' spice mixture, so I started by thinking what flavors might complement that mixture.  To replace the typical pate and duxelles topping for the meat, I came up with the following:

  • A handful of walnuts, finely chopped
  • 1 TBSP dark brown sugar
  • 2 TBSP whiskey (cheapest thing you have, don't go for the top-shelf stuff here)
  • 1 TBSP butter
  • 1 Granny Smith apple, finely chopped
  • A spritz of lemon juice
  • 3/4 oz. raisins
Begin by toasting the chopped walnuts very slightly in a pan over low heat.  Add the diced apples and cook over low heat for about 5 minutes or so, stirring occasionally.  Add the remaining ingredients (except the raisins) and cook over medium-low for 10-15 minutes, or until the apples begin to soften.  Remove from the heat to a food processor and chop very finely (almost to a paste consistency).  Transfer to a small container, add the raisins, and mix together.  Cover tightly, and refrigerate until ready to use. 

The instructions on the pork loin said to cook for 25-30 minutes, and then check the temperature with a meat thermometer.  My original plan was to cook the loin for 15-20 minutes, cool it for 5 min or so, just so I could handle it, wrap it in phyllo dough, and cook it the 30 or so minutes needed for the pastry to be done.  Unfortunately, I'd forgotten that I'd thrown our old meat thermometer away because it didn't work.  Whoops.  I'd never cooked meat in pastry before and, as I was fighting other factors (power which kept coming and gone thanks to a nasty line of storms moving through the area), I thought I'd play this one extra safe. I ended up cooking the pork loin for about 25 minutes (about 95% of the way done) and then removing it from the oven to let it rest for a few minutes.  Phyllo dough usually comes in a box with two individually-wrapped portions.  I used one half of one of these portions, prepared as per the instructions.  Phyllo is kind of intimidating to work with at first, but once you realize it's not an exact science and just do it, it's not so bad.

Once the phyllo was prepared, I spread some of the apple/walnut mixture out across the dough...


And then added the pork loin...


After wrapping up the loin, I baked this for about 30 minutes at whatever the package said (I believe it was 350).  I was really nervous with how this was going to turn out, but in the end it looked pretty nice!


We served this with fresh asparagus spears with hollandaise and it was really tasty.  The sweetness of the apple/walnut topping worked nicely with the buttery richness of the phyllo and the savory spice of the pork. The only thing I would have change is next time I would make sure I had a reliable meat thermometer on hand.  The pork was slightly over-done (no surprise considering I cooked it almost all of the way before the additional 30 minutes baking inside the pastry) but I wanted to play it safe since I didn't have a thermometer.  All in all though, especially from cooking on a whim, this turned out pretty nicely! 


Friday, August 5, 2011

Hefeweizen Cupcakes??

I just came across this link on a Schafly Facebook post.  I'm not at all sure we'll have time to give this a shot this weekend, but I'll tell you what; I'm intrigued.  We're definitely going to have to try this out sooner rather than later...

Restaurant Review: Taj Mahal

     So Jessi and I decided that after a really long week we needed to get out a bit today and grab a bite for lunch.  We were crarving Asian food of some sort, and as we'd just been to Bangkok Gardens (look for a review in the future) we figured we'd give Taj Mahal (one of the two Indian restaurants in town) a try, as we hadn't been there in forever.  In the past, we've had generally very positive experiences at Taj, although some of our friends have told us horror stories about the place (usually revolving around rude servers and a difficult-to-deal-with management).  That being said, we'd almost always been very pleased with the food, and (except them opening 15 minutes late one day and having to wait another 10 minutes for food to hit the buffet) have not really had any problems with the place.  Today, unfortunately, when we finally decided to review it, the food was sub-par.  Including tax, two lunch buffets is $17-something, which isn't too bad; with a $2 tip (all you need at a buffet), you're out the door for less than $20, for as much food as you'd care to eat.  The selection on the buffet today was pretty good: chicken curry, chicken tikka masala, saag, a potato and lima bean curry, a veggie korma, and a few other assorted curries.  There was bhatura, naan, and one other type of bread.  The dessert end of the buffet was nicely stocked with rice pudding, gulab jamun, and a few other things.  All in all, it looked like things were giong to be pretty nice. 
     Unfortunately, the food itself was not quite up to Taj's normal standards.  The naan that was out (we were the first ones there) was floppy-soft and not crispy at all; my thought was that it had possibly been reheated, something you just can't do with naan.  A tray that passed us on the way out to the buffet later looked better.  The saag was pretty good, even without the paneer, which is usually how I prefer the dish.  The chicken tikka masala, which is usually excellent at Taj was mediocre today.  The bhatura was nice.  The rice pudding was great, as per usual, but the gulab jamun (usually something we can't get enough of) was a bit doughy and the sauce wasn't quite as light/tasty as it usually is.  Jessi didn't think the tikka masala was bad, just a bit different than usual, but she said the lima bean and potato curry was 'just ok'. 
    All in all, it was a bit of a disappointment, especially considering how good it's been in the past.  It certainly wasn't bad enough that we would say we won't try it again, but we might give India's House (the other Indian joint in town) another try to compare the two.  Before, we never went there because Taj was so good.  Only time will tell I guess, and even the best places can have an ocasional off-day now and again. 

Tuesday, August 2, 2011

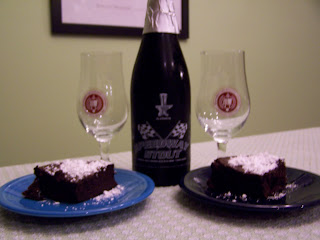
Happy Anniversary!!! (Flourless Chocolate Cake and Speedway Stout)

Since it has been so crazy around here as of late, the plan was to celebrate our anniversary on Friday, Saturday, and Sunday, rather than try to come up with something Monday night.  But Jess was helping with Bible School Monday night, and that gave me the perfect cover to work in the kitchen for awhile and try to come up with something to surprise her.  I've been married (well, and dating, for that matter) long enough to know that chocolate is one of the certain ways to a woman's heart.  In the case of my particular lady, coffee's right up there too (more on that later).

We'd sampled flourless chocolate cake before, in fact, just a couple nights before at Sycamore, and were really impressed by the intensity of the flavors and the richness of the cake itself.  It really is the cake for the '12-step-program' chocoholics among us; I'm looking at you, darlin.  Anyway, years ago, I picked up a magazine entitled "The Best of Fine Cooking: Chocolate" at some store or other, and it's given us some of the best chocolate recipes we've made to date.  I took their original recipe for flourless chocolate cake and halved it; the half-recipe is what's printed below.

   -6oz bittersweet baker's chocolate, coarsely chopped
   -3oz unsalted butter, cut into pieces (more for greasing the pan) 
   -2.5 large eggs (just crack the 3rd egg into a separate bowl, scramble it, and use half)
   -1/2 c. sugar
   -3/4 tsp. vanilla
   -1/8 tsp. salt
   -1/8 cup cocoa powder, sifted if lumpy, more for the pan


You start with butter and chocolate...It's tasty, not healthy...
Heat the oven to 300.  Grease a 6" round cakepan with butter and line the bottom with wax paper.  Dust the sides of the pan with cocoa, so that it sticks to the butter, and dump out the extra.  Melt the chocolate and butter together in a medium bowl and let cool a bit.  Combine the eggs, sugar, vanilla, salt, and 2 TBSP of water with in a mixer (with the whisk attachment).  Beat on medium-high until the mixture is foamy, pale, and about doubled in volume (2-3 min).  Drop the mixer to low, and slowly pour in the chocolate mixture.  Increase the speed to medium and beat until well blended.  Drop speed, add the cocoa powder, and mix on medium/medium low until just blended.  Make sure you've scraped down the sides of your bowl once or twice to make sure everything's mixed properly.  Bake betwen 30-40 minutes (toothpick should come out looking wet with small gooey clumps).  Make sure it's done, but try not to overbake it. 

Let cool in the pan for 30 minutes; if your surface is uneven, gently press down with your hands (covered with a paper towel or small plate) to even out the surface while it is still warm.  Remove cake from pan, and refrigerate overnight. 

The recipe in the magazine had a rich chocolate frosting for this cake, but we felt that was just a bit over the top.  Dust this bad boy with some powdered sugar and you're good to go.  We served this with Alesmith Speedway Stout which turned out to be an absolutely perfect pairing.  We'd been saving this for awhile (I got it through a trade from a guy in Ohio, I think) and I thought it might go well with the cake.  It had a lovely chocolate-covered-espresso bean flavor with just a hint of booziness which cut through the richness of the cake perfectly.  All in all, a great night! 


Monday, August 1, 2011

Basil Pesto (For the Freezer)

If you knew me or my family growing up, you know that my dad is something of a gardening prodigy. Or a lunatic.  I'm not sure which (though I'd lean towards the former).  We were the people that had something like a half-acre in our back-yard converted to gardening space, and whatever he tried to grow seemed to turn out way better than anything that was available in the supermarket, even when it was in season.  Yup, we were the people that had signs like 'Fresh Cukes' or 'Giant Pumpkins' tacked up along Main Street, which brought a wealth of customers (some more welcome than others) by the house to buy fresh produce.

Fast forward 15 years.  Now, as my family grows older, I realize that I'd really like to take up some of the old family traditions so that I can pass them on to our children one day.  So Jess and I tried gardening last year.  We found out a few things.  First, don't buy pepper plants once they've already set their roots down in the pots; they won't be worth crap the rest of the year.  Second, butternut squash will take over the entire small garden plot...and your yard...and they have eyes on the neighbors yard as well.  This year, we bricked up our small garden, and made it look nice.  We went simple this year: basil, cilantro, and hot peppers (attempt #2).  Unfortunately, both Jess and I are so crazy busy, we haven't had time to take care of the garden like we should (I forgot how much time my dad had to put into his garden to get things to come out just right). Let's just say that we're now cultivating coriander instead of cilantro, and we made the same mistake with the peppers that we did last year.  Ugh.

The one thing that did well was the basil.  A little too well, in fact.  We've got basil taking over our garden.  So what to do with it?

We decided we wanted to make pesto, but we wanted to be able to save it.  My wife, being awesome like she is, found a number of recipes online, and figured out a way to freeze our fresh pesto so (1) we could use a lot more of the basil without getting sick of pesto and (2) have pesto for the long run.  After working on this for awhile, and throwing together some recipes from difference sources, we came up with the following:


  • 3 c. fresh basil leaves, rinse and dried
  • 3/4 c. extra virgin olive oil (use the best you have, but don't break the bank)
  • 1/2 c. chopped walnuts (pine nuts are way expensive, and we love walnuts)
  • 3-4 tsp. crushed garlic 
As we said, we're making this for the freezer.  You begin with placing the basil leaves, walnuts (roughly chopped already) and garlic in a small food processor.  Pulse/whir those ingredients together until they're well mixed, scraping down the sides of the food processor as you go.  Then, drizzle in the olive oil slowly, while you continue to blend.  Blend until the mixture is fairly uniform in texture.  Here's the cool part.  Take a measuring spoon and spoon out the pesto into a regular ice-cube tray.  This amount should just about fill (we had two slots left empty) one tray.  Freeze for at least a day, and then place into a freezer-proof bag and date.


You'll notice, I'm sure, that something is missing.  What about the cheese?  The freezer recipes we found said not to add the cheese until you thaw out the pesto for use.  What we plan to try is adding 1 tbsp. of freshly-grated Parmiagiano-Reggiano or Pecorino Romano for each cube.  


What will we use these for?  We figure we can throw them (after thawing) into pasta, or add to cream to make a pesto-cream sauce.  You could use it on bruschetta or as a dipping sauce for bread.  There's all kinds of things you can do with them really.  We haven't tried this in anything yet; we'll let you know how it tastes when we do!

Sunday, July 31, 2011

Sausage Bread!!!

It's hard to believe, but Jessi and I have now been together for over seven years, and our two-year wedding anniversary is tomorrow, August 1st.  We went out for dinner at Sycamore on Friday evening (that's a separate post, coming soon), and since she's helping with VBS tomorrow evening, we're doing our special meal tonight.  And, instead of going for something crazy-fancy that will break the bank and necessitate us cooking all day, we went with an old, long-time favorite. 

We had sausage bread for the first time at Johnny's near the beginning of our relationship and were immediately struck by the idea.  Delicious, homemade Italian sausage stuffed inside crispy Italian/French bread, with cheese, herbs, et al.  Simple concept, delicious result.  Since Johnny's wasn't exactly cheap either, we attempted to make this at home.  It worked wonderfully, and while I still don't agree with Jess that mine's better than the restaurant version, it's definitely something we come back to as a standby when we need something 'special' for dinner.

The recipe I use for the sausage stuffing is based on Emeril's recipe for mild italian sausage.  Our version is really close to Emeril's, with a couple important changes.  Here's our recipe. 

   -1 lb. ground beef, as lean as you can get (we usually use 93/7, but 95/5 is even better)
   -2 tbsp. crushed garlic
   -1 tbsp. paprika
   -1 1/2 tsp. fennel seeds (you can toast/crush them, but I usually get lazy and don't)
   -1/2 tbsp. salt
   -1/2 tbsp. black pepper
   -1 tsp. cayenne (or substitute 1/2 tsp. cayenne and 1/2 tsp. red pepper flakes)
   -1/2 tsp. anise seeds
   -2 or 3 tbsp. dried parsley flakes
   -3 tbsp. dry red wine (whatever's left over in the fridge, but Chianti or Cab. Sauv. is best)
  

Ok, so here are the differences.  Emeril's recipe uses 3 lbs of pork butt in his recipe.  We use a much leaner cut of meat, and only a third as much.  Thus, what we end up with can't really be called 'mild Italian sausage'; it's definitely got a bit of a kick to it.  If you want to back off on the spice, halve the cayenne and/or red pepper flakes.  We also halve the amount of salt and pepper he uses in his recipe, as with only a third the amount of meat, 1 tbsp. of each becomes overpowering. 

Mix the meat and the other ingredients together by hand (only way to get this right, IMO) and then ball it up in a bowl and let it sit, covered lightly, in the fridge for at least 2 and up to 8 hours, or even over-night if you have the time.  When you're ready to assemble the sausage bread, fry this up in a non-stick skillet with a bit of non-stick cooking spray and then transfer to a plate/bowl to let cool for 10-20 minutes.

When I said this recipe was easy, I meant it.  For the bread, we go very simple, and buy Pillsbury Pizza Crust--Thin Crust style.  Yup, that's right.  The stuff in the blue can.  We've also used the French Bread (also from the can) but find that the thin crust works much better.  Lay out some parchment paper (or tinfoil, if you don't have parchment paper) on a large cookie sheet and dust lightly with flour.  Remove the dough from the container.  You'll notice that there's a seam all along one side.  Gently unroll the dough along this seam until you have a flat rectangle on your cookie sheet. 

Here's where budget and relative ease of task come into play.  If you want to take the flavors up a notch, by all means, go out and get a block of Parmigiano-Reggiano and a bit of Pecorino Romano to mix in with your garden variety shredded mozzarella.   If you're not feeling particularly flush in a given week (unless you get it at somewhere like Sam's Club, Parm-Regg runs something like $15 a pound) you can easily just substitute a garden-variety 'Italian Blend' shredded cheese mixture from the grocery store (We especially like HyVee's).  Are the specialty cheeses worth it?  Yes and no.  If you mix in the Parmigianno-Reggiano and Pecorino Romano (the Pecorino especially is tangy and salty) your flavors will have a bit more depth, but then again, you have to shell out the cash for the cheese and then spend time grating it with a box grater or the like.  In the end, it works either way.

Once the dough's rolled out in a rectangle, put about half of your cheese mixture down on the dough, leaving about 2" free around all four edges.  Then load on the sausage, in sort of a ridge, running horizontally along the dough (the dough should be laid out w/the long edges on the top and bottom, the short edges on the two sides).  Place the remaining cheese on top.  If we're using 'bagged' cheese, we typically use between 3/4 of an 8oz package and the whole thing.  Just don't use so much that you won't be able to get the crust sealed up.  After the meat and cheese are laid out, carefully (it really helps to have two people to do this) bring the short edges together up to the middle.  Do the same with the remaining two edges until a seam is made along the top.  Wet your fingertips and press the dough of this seam together.  If the dough doesn't stick perfectly, don't worry, you just want it sealed enough so all the tastiness inside doesn't come out. 

Bake at 350 for approximately 30 minutes, and check for doneness.  The bread should be golden brown on top.  If it's still a bit doughy in parts, give it another 15 minutes or so.  If, on the other hand, the top is getting a bit too brown and the rest of the dough doesn't look quite cooked enough, place a sheet of aluminum foil over the top of the loaf.  This will slow down/stop any burning.  And, if you're lucky (it took us several tries to get this all to work correctly) you'll have something like this...


And the deliciousness inside...


Grasshopper Cake!


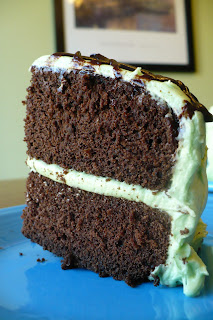
(Vegan) Grasshopper Cake
adapted from Vegan Desserts by Hannah Kaminsky
© 2011 from Skyhorse Publishing


As some people might know, Dan once told me that vegan food can't taste good.  If you know me, then you'll guess at once that meant CHALLENGE.  I'm not a vegan--I'm not even a vegetarian...but I have definitely been on a mission to make delicious vegan food! (Just to prove Dan wrong).  So, without further ado, here's the latest addition to the challenge--vegan grasshopper cake.  I will put a disclaimer on this recipe, however, because I don't think too hard about actually ensuring that I'm using 100% vegan ingredients.  I generally just use what I have on hand.  That being said--I'll give you the cookbook recipe and let you know if/when I made substitutions. Sound fair?


Pre-heat the over to 350°F and lightly grease 3 8-inch round pans or 2 9-inch round pans (or, you can do like me, and do 2 6-inch pans and 12 cupcakes!)


Devil's Food Chocolate Cake

  • 2 1/2 cups plain non-dairy milk (I used Unsweetened Almond Milk)
  • 1 TBSP apple cider vinegar
  • 2/3 cup canola oil (I used the regular vegetable oil I had on hand)
  • 1 1/2 cups granulated sugar
  • 1 1/2 tsp instant coffee powder (I actually used instant espresso granules)
  • 3 cups all-purpose flour (I used Softasilk Cake Flour)
  • 1 cup natural cocoa powder (I just used by regular Nestle cocoa powder. Natural?)
  • 2 tsp baking powder
  • 1 tsp baking soda
  • 1 tsp salt
  • 1 tsp vanilla extract
Combine the milk and vinegar and let sit for ~5 minutes.  Pour this mixture into your stand mixer and add oil, sugar, and instant coffee. Mix well (until slightly frothy).

In a separate bowl, combine flour, cocoa, baking powder and soda, and salt. Whisk briefly and then add to stand mixture in 3 additions, allowing the mixture to combine well between each addition. Once you've added all the dry goods, add the vanilla and mix just until incorporated.

Distribute the batter between your prepared pans and use a spatula to smooth down the tops. Bake for 24-28 minutes, until a toothpick inserted into the center comes out clean. Let cool in the pans.

Creme de Menthe Frosting

  • 2 medium sized ripe avocados
  • 2 tsp lemon juice
  • 7-9 cups confectioner's sugar
  • 1 cup non-dairy margarine (I actually didn't even have regular butter or margarine on hand...so I used 1/2 cup of Vegetable Crisco...)
  • 1 tsp vanilla extract
  • 2 TBSP Creme de Menthe
  • 1/2 tsp peppermint extract
Prep the avocado and puree in a food processor or stand mixer, adding in the lemon juice immediately and pulsing to combine.

Toss in the margarine (or Crisco) and mix.  Scrape down the sides as needed to make sure the mixture is homogenous before continuing. Slowly add the sugar in three separate additions.  Add the salt, vanilla, creme de menthe, and peppermint.  Allow the food processor or mixer to run, mixing and whipping the frosting for about 5 minutes until light and fluffy.  Frost your cooled cake!


Quick Chocolate Drizzle
  • 5 ounces semisweet chocolate, finely chopped
  • 1/4 cup plain non-dairy milk (I used Unsweetened Almond Milk)
This is totally an optional adornment for your cake, but it's absolutely delicious!

Place the chocolate and milk in a microwave-safe dish and heat for 30-60 seconds in the microwave, until the chocolate is mostly melted.  Stir thoroughly with a spatula until completely smooth, and voila, instant ganache! Drizzle to your heart's content!

(I actually put my ganache in a small plastic baggie and then cut the corner off to do the drizzle.  Just my little trick!)

Friday, July 29, 2011

Restaurant Review: Sycamore

  Jess and I were looking for some place special to celebrate our two-year wedding anniversary and, as we'd had really good experiences at Sycamore before, we figured we'd give the place another shot.  Sycamore is classy, upscale local dining establishment, whose 'mission is to provide seasonal, market-driven fare at affordable prices.'  I'm not exactly sure how to classify the style of their food; if forced to describe it, I'd say it's something of a mix of continental European and contemporary American cuisine.  The menu changes weekly (and sometimes more frequently) and features a nice mix of salads, appetizers/small plates, and entrees.  I should mention that, although we've been there 2-3 times now, we've never actually ordered the large plates.  Instead, we prefer to each get a couple of small plates or a small plate and a salad, to share them around, and get a bit more diversity for our dollar.  The wine and beer menus (esp. the beer menu) are phenomenal.  Sanford (one of the owners, and in charge of the bar) loves craft beer and fine wine, and there is literally something on their extensive drink menus to please just about anyone.  These menus, like the food menu, change fairly frequently. 
    Jess started off with a glass of the house merlot ($4), which we've found to be quite affordable and easy to pair with a variety of dishes, while I had a goblet of Goose Island's Fleur on tap ($5).  Our waitress was really attentive, and showed up to take our drink orders almost as soon as we'd sat down.  She was friendly, helpful, and knew the extensive drink and food menus well enough that she didn't write a single thing down the entire night (service at Syc is pretty much second-to-none around here).  While sipping our drinks and munching on the complimentary house bread and sun-dried tomato butter, we picked out our dinner.  For starters, Jess ordered the Greek salad ($9, slices of cucumber, tomato, calamata olives, red onion, and local feta, with olive oil and lemon juice) while I chose the brandade ($7, salt-cod and potato cake, breaded with crushed potato chips and fried crisp, served with artichoke remoulade, capers, and fried lemon).  The Greek salad was fantastic, with lots of fresh, vibrant flavors.  The only downside was that the cucumbers were just a touch on the bitter side.  The brandade was quite tasty as well, though just slightly softer/moister in texture than the last time I'd had it.  The artichoke remoulade and fried lemon slices were to die for.  For our dinner, Jess ordered the gnocci ($9, house-made potato Gnocchi, sauteed shiitakes, Swiss chard, and Parmigiano-Reggiano) while I opted for the duck pate ($8, duck livers and sherry mousse, pickled red onion, cornichons, and buttermilk crackers).  Jess loved the gnocchi, the pasta was rich and decadent, and the only thing she didn't like was the mushrooms (she's not a mushroom girl).  The duck pate, while quite good, didn't impress me quite as much as the country pate they sometimes serve that comes in its own small terrine (as opposed to sliced on the plate).  The duck version was slightly firmer in texture, and so rich that the two small slices was the perfect amount.  The crackers were spiced with a wonderful Indian spice (I'm not sure what it is, small black seeds, that we've often had at Indian restaurants on their appetizers), and the stone-ground brown mustard and pickled onions went wonderfully with the pate.  I ordered a second beer ($3.50), Tallgrass' new Halcyon wheat; it was the only disappointing thing of the entire evening.
   We weren't planning on getting dessert, but then our waitress brought out the menu.  We opted to split a slice of flourless chocolate cake with vanilla bean ice cream ($6) and some espresso ($2).  Absolutely fantastic, on both accounts.
   All in all, it was a great dinner.  Sycamore has never disappointed us (except once for lunch with friends when a waiter got a friend's order wrong and didn't offer her a discount, free dessert, etc, as restaurants will often do) and this time was no exception.  The atmosphere is warm, cozy, and upscale without ever hinting at pretension.  The wait-staff and bar-tenders are absolutely top-class as well.  While it's certainly not a cheap venue, there's also nothing on the menu over $27, and most of  the large plates are in the low-mid twenties.  When you think of it, you can pay nearly this much for steak or seafood entrees at crummy chain restaurants, and the prices have always struck us as quite fair.  If you go there expecting to pay $18 for mounds and mounds of food (increasingly rare even at the big chains these days) you will be disappointed.  The portions are just right, and considering the wide and ever-changing variety of flavors offered, it's easy to forgo the large plates and just share several apps or small plates amongst the table.  (For the record, from what I've heard, their large plates are fantastic as well).  Though we can't swing the cash to go very often (though they do have wonderful happy hour specials on drinks and appetizers), whenever we go to Sycamore, we know it will be a memorable night.

Saturday, March 12, 2011

Creamy (Vegan) Avocado Pasta

I like to try new things.  Just ask my poor husband.  Lately, I’ve been on a quest to prove that there is delicious vegan food out there.  I know, crazy thing for a non-vegan to do but bear with me here.  For awhile, I was a vegetarian.  I just wanted to try it.  Now, I’m not anymore.  I generally stay away from red meat (occasionally we’ll have a steak or burgers, but I just don’t crave it too much. Give me a chicken breast any day!) and I, on the whole, just don’t eat a lot of meat.  I’ve found a lot of ways to eat delicious other things instead.

Anyway, what I’m trying to get to, really, is the delicious pasta dish that I made tonight–that happens to be vegan. And *gasp* the hubby liked it. He even said he’d eat it again!


Creamy Avocado PastaAdapted from Oh She Glows

Ingredients:
  • 8 oz. brown rice vermicelli
  • 2 TBSP lemon juice
  • 4 tsp minced garlic
  • 3 TBSP olive oil
  • 1 TBSP dried basil
  • 2 “dashes” of salt
  • 2 ripe avocados
  1. Cook the pasta according to the directions on the package.
  2. While the pasta is cooking, combine in the EVOO, garlic, and lemon juice in a food processor. (Or, if you’re me, the 3 cup food chopper that you own) Blend until well-mixed
  3. Add the avocado and basil.  Blend again until creamy.  Add a few dashes of salt and blend some more.  Use a spatula to get some of the stuff from the bottom up and blend some more!
  4. Drain your pasta, add the sauce, and enjoy!
This was a DELICIOUS pasta dish! I doubled the recipe as provided by OSG, because the pasta was difficult to divide into servings.  Consequently, we ate a tad more than we really should have.  Nevertheless, it was quite good.  The avocado flavor was there, but not too strong, and melded well with the garlic and lemon juice.  I actually think that I’ll use less olive oil next time.  OSG also called for fresh basil leaves, which I hope to try next time I make this.  The basil flavor didn’t come through really at all, but I didn’t have access to fresh basil this time of year.  Definitely a delightful, refreshing dish that we’ll make again.
Happy weekend!

Saturday, February 26, 2011

Lasagna without Pasta??

Yep, that’s right: lasagna WITHOUT pasta. No pasta of any kind.  I made it with this:


Yep, this officially marks my first (and more than likely not last) time I have ever used spaghetti squash. I’ve seen it a lot on food blogs that I read and on SparkPeople, so I finally decided to try it out with this recipe:


Zucchini and Spaghetti Squash “Lasagna”

(adapted from GreenLiteBites)

Ingredients:
  • 1 spaghetti squash (about 2 pounds)
  • 1 medium zucchini
  • 1/2 cup reduced fat shredded mozzarella
  • 1/2 cup fat free ricotta
  • 14 oz can crushed Italian style tomatoes
  • Italian seasoning
  • Parsley
  • Black pepper
Directions:
  1. Preheat the oven to 350F.
  2. Poke holes in the rind of the squash and microwave for about 10 minutes (4-5 minutes for every pound).  Allow the squash to cool for a few minutes and then cut it in half (long ways) and scoop out the seeds/pulp.  Be careful not to scoop out the squash flesh!
  3. Using a fork, remove the squash flesh.  It really does look a lot like spaghetti noodles! (see above picture)
  4. Slice the zucchini as thin as you can.
  5. Using an 8 1/2″ x 11″ pan, put a little bit of the crushed tomato sauce on the bottom (to keep the zucchini from sticking)
  6. Layer the zucchini, squash, sauce, and cheese until you run out.  Sprinkle a little Italian seasoning on top of each layer of sauce (optional). Top with crushed black pepper and parsley.
  7. Bake in the 350F oven uncovered for 45 minutes.  Because there is no pasta to soak up the water, you will want to use a turkey baster to remove the water every 10 minutes or so.

    
    This was DELICIOUS! I will totally make it again.  Hubby thinks maybe a little more sauce next time, but it might be okay as is.  We may use actually sauce instead of crushed tomatoes next time; we just used what was on had this time! I’m actually really excited to try more recipes with spaghetti squash! It was SO much easier to work with than I expected!

Thursday, February 17, 2011

Pumpkin Pie Cinnamon Rolls

At my new job, we have a breakfast tradition that I have swiftly been incorporated into.  We rotate through the admin staff (alphabetically) and each person brings in a Monday morning breakfast.  Well, it’s my turn!  Not one to ever take the easy route (apparently) I decided weeks ago that I was going to make cinnamon rolls…from scratch.  My original plan was to make some from my Betty Crocker cookbook using the sweet roll dough that I made rolls from not too long ago for Christmas. However, in my endless blog surfing, I came across a recipe that I simply couldn’t resist trying. So, without further ado, here it is!


I got this recipe from OnSheGlows, a food website that has mostly vegan recipes.  I adapted it to use non-vegan ingredients (e.g. regular skim milk and butter), but other than that, I pretty much followed the recipe exactly.  It’s pretty complicated, so I’m not going to reproduce it all here.  Definitely check out the link! She has a ton of good looking stuff that I’m planning on trying in the (near) future!
I made her sweet dough to a “T” with three minor exceptions. I substituted skim milk for the almond milk, regular unsalted butter for the Earth Balance, and instead of using Egg Replacer, I used 1 TBSP cornstarch and 2 TBSP water.  Well, actually, those were the only things I really changed basically throughout the recipe.  Whenever she used almond milk, I used skim milk and vegan butter was always just regular butter (with the exception of the frosting….because I was out of butter!)
Also, I totally cheated with the cream cheese icing.  She has you mixing it by hand.  I gave it a go…and gave up.  I got it to the right consistency, but I couldn’t get all the butter lumps out….so I busted out my hand mixer.  Whatever. I’m lazy, so sue me! :-) This cream cheese frosting is DELICIOUS.  I’m totally going to use it again to frost cupcakes or something because YUM.  (Oh, and I suppose I should mention that I didn’t use the vegan cream cheese…just the regular stuff from a tub…light).
Related Posts Plugin for WordPress, Blogger...